Automatically import demos in a child theme – a ready-made solution
Are you a designer or developer and have an idea for an exciting WordPress theme that you’d like to sell? Maybe you even have a finished product, but you have no idea how to take care of the user experience, who should be able to easily install the theme on their site with all the settings, demo content, and plugins. This tutorial will present a way to easily import content and settings that I use in my own products. I’ve also prepared a free child theme that contains all the code discussed in this tutorial and which you’ll be able to customize to your needs quickly.
What you’ll need
- your own base or child theme that you want to sell
- free plugins: One Click Demo import, Widget Importer & Exporter Customizer Export/Import
- A configured and content filled demo site based on WordPress
In this tutorial, I’ll use a pre-made Kadence child theme, which contains the complete code discussed in the article. You’ll find a form to download the theme for free at the end.
What we want to achieve
After installing your theme, the user should easily download all the necessary resources to make their site look exactly as they saw it in the demo version. We can list the following here:
- Plugins necessary for the website to work (e.g., if you use a form plugin – it should be installed before the user installs the demo
- The content and its structure, including the menu. These can be articles, products, or simply pages built from blocks
- Customizer settings (colors, fonts)
- Widgets (not used that often, but we shouldn’t forget about them)
Of course, you can prepare export files and write detailed instructions on importing all these elements. However, this is not the fastest way, it is fraught with errors on the user’s side, and it conflicts with the idea of a premium product.
In this article, I’ll present a way to automate the entire user demo import process using only free solutions. So let’s start by discussing the plugins that will allow you to easily perform each of these steps.
Automatically install the necessary plugins
First of all, let’s start with the essential rule: installing plugins cannot occur outside the user’s awareness. Plugins cannot be included as libraries in the theme. Plugins should be installed like any other plugin in WordPress and updated. Otherwise, you pose a security risk to the user’s site.
We can distinguish 2 types of plugins here:
- Premium or unavailable in the WordPress directory – if their license allows it, you can redistribute them with your theme.
- Plugins from the WordPress directory – you shouldn’t copy them to your package; they should be downloaded directly from the WordPress repository
The universal solution for both types is the TGM Plugin Activation library, which you can include in your theme (or child theme). A good place to have the library is the function.php file. Setting up the library is very simple and comes down to passing in an array of required and optional plugins.
<?php

/**
* Include the TGM_Plugin_Activation class.
*/


require_once get_stylesheet_directory() . '/libs/tgm-plugin-activation/class-tgm-plugin-activation.php';

add_action( 'tgmpa_register', 'rocksite_example_register_required_plugins' );

/**
* Register the required plugins for this theme.
*
* In this example, we register five plugins:
* - one included with the TGMPA library
* - two from an external source, one from an arbitrary source, one from a GitHub repository
* - two from the .org repo, where one demonstrates the use of the `is_callable` argument
*
* The variables passed to the `tgmpa()` function should be:
* - an array of plugin arrays;
* - optionally a configuration array.
* If you are not changing anything in the configuration array, you can remove the array and remove the
* variable from the function call: `tgmpa( $plugins );`.
* In that case, the TGMPA default settings will be used.
*
* This function is hooked into `tgmpa_register`, which is fired on the WP `init` action on priority 10.
*/
function rocksite_example_register_required_plugins() {
  /*
   * Array of plugin arrays. Required keys are name and slug.
   * If the source is NOT from the .org repo, then source is also required.
   */
  $plugins = array(

     // This is an example of how to include a plugin bundled with a theme.
     array(
        'name'               => 'Your External Plugin',
        // The plugin name.
        'slug'               => 'your-external-plugin',
        // The plugin slug (typically the folder name).
        'source'             => get_stylesheet_directory() . '/libs/tgm-plugin-activation/plugins/tgm-example-plugin.zip',
        // The plugin source.
        'required'           => TRUE,
        // If false, the plugin is only 'recommended' instead of required.
        'version'            => '',
        // E.g. 1.0.0. If set, the active plugin must be this version or higher. If the plugin version is higher than the plugin version installed, the user will be notified to update the plugin.
        'force_activation'   => FALSE,
        // If true, plugin is activated upon theme activation and cannot be deactivated until theme switch.
        'force_deactivation' => FALSE,
        // If true, plugin is deactivated upon theme switch, useful for theme-specific plugins.
        'external_url'       => '',
        // If set, overrides default API URL and points to an external URL.
        'is_callable'        => '',
        // If set, this callable will be be checked for availability to determine if a plugin is active.
     ),

     // This is an example of how to include a plugin from a GitHub repository in your theme.
     // This presumes that the plugin code is based in the root of the GitHub repository
     // and not in a subdirectory ('/src') of the repository.
     array(
        'name'     => 'One Click Demo Import',
        'slug'     => 'one-click-demo-import',
        'required' => TRUE,
     ),

     // This is an example of how to include a plugin from the WordPress Plugin Repository.
     array(
        'name'     => 'Contact Form 7',
        'slug'     => 'contact-form-7',
        'required' => FALSE,
     ),


  );

  /*
   * Array of configuration settings. Amend each line as needed.
   *
   * TGMPA will start providing localized text strings soon. If you already have translations of our standard
   * strings available, please help us make TGMPA even better by giving us access to these translations or by
   * sending in a pull-request with .po file(s) with the translations.
   *
   * Only uncomment the strings in the config array if you want to customize the strings.
   */
  $config = array(
     'id'           => 'rocksite-example',
     // Unique ID for hashing notices for multiple instances of TGMPA.
     'default_path' => '',
     // Default absolute path to bundled plugins.
     'menu'         => 'tgmpa-install-plugins',
     // Menu slug.
     'parent_slug'  => 'themes.php',
     // Parent menu slug.
     'capability'   => 'edit_theme_options',
     // Capability needed to view plugin install page, should be a capability associated with the parent menu used.
     'has_notices'  => TRUE,
     // Show admin notices or not.
     'dismissable'  => TRUE,
     // If false, a user cannot dismiss the nag message.
     'dismiss_msg'  => '',
     // If 'dismissable' is false, this message will be output at top of nag.
     'is_automatic' => FALSE,
     // Automatically activate plugins after installation or not.
     'message'      => '',
     // Message to output right before the plugins table.


  );

  tgmpa( $plugins, $config );
}

?>
Even though there is a bit of code here, you can easily find places where you can define your own list of plugins.
Let’s start with the part where I added a plugin available in the WordPress repository to the required list:
// This is an example of how to include a plugin from the WordPress Plugin Repository.
array(
'name'      => 'Contact Form 7',
'slug'      => 'contact-form-7',
'required'  => true,
),
As you can see, it literally only takes 3 elements in the array to add the Contact Form 7 plugin requirement. You can add any plugin available in the WordPress repository this way – all you need is a name and a slug.
The second array is more complex, and you have to make sure that the package is in the right place indicated in the array:
// This is an example of how to include a plugin bundled with a theme.
array(
  'name'               => 'Your External Plugin',
  // The plugin name.
  'slug'               => 'your-external-plugin',
  // The plugin slug (typically the folder name).
  'source'             => get_stylesheet_directory() . '/libs/tgm-plugin-activation/plugins/tgm-example-plugin.zip',
  // The plugin source.
  'required'           => TRUE,
  // If false, the plugin is only 'recommended' instead of required.
  'version'            => '',
  // E.g. 1.0.0. If set, the active plugin must be this version or higher. If the plugin version is higher than the plugin version installed, the user will be notified to update the plugin.
  'force_activation'   => FALSE,
  // If true, plugin is activated upon theme activation and cannot be deactivated until theme switch.
  'force_deactivation' => FALSE,
  // If true, plugin is deactivated upon theme switch, useful for theme-specific plugins.
  'external_url'       => '',
  // If set, overrides default API URL and points to an external URL.
  'is_callable'        => '',
  // If set, this callable will be be checked for availability to determine if a plugin is active.
),
Another parameter is the source, specifying where the plugin is downloaded from. In this case, I placed the zip file for installation inside the theme directory.
Thanks to this configuration, the user will see the following message in his administration panel:

By clicking on Begin installing plugins, the user can start the process of installing all the necessary plugins.
Preparing import files with content.
Before we move on to the settings and content import configuration, you have to prepare the appropriate files by exporting data from your demo. First of all, we will use a well-known tool – the built-in WordPress export module.
I’m assuming that you already have a final demo version of your target site with all the content and settings.
Go to the Tools tab, then export and create a file with all the content:

This will generate an XML file which you will use in a moment in the import configuration. In my case, it generated testwordpress.WordPress.2022-03-11.xml You can freely rename it.
Export Customizer Settings
Similarly, you can create a file with all the customizer settings. Font, color, or header settings should be automatically copied to the user’s page. In this case, it is necessary to install an additional plugin: Customizer Export/Import
Immediately after installation, go to the tab: Appearance->Customize, and in Customizer, select Export Import. The settings export panel appears:
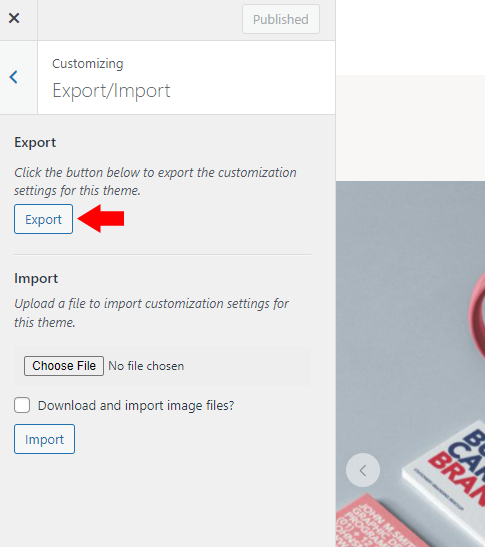
When you click the export button, a .dat file is generated. You can name it anything you like; in my case, it is: theme-export.dat
Export Widgets Settings
If you use widgets in your theme, it is also worth moving them quickly to the user’s page when installing the theme. An additional plugin is also required to generate a settings file: Widget Importer & Exporter
After installing the plugin, go to the Tools -> Widget Importer & Exporter tab and use the Export Widgetsbutton to create an export file:
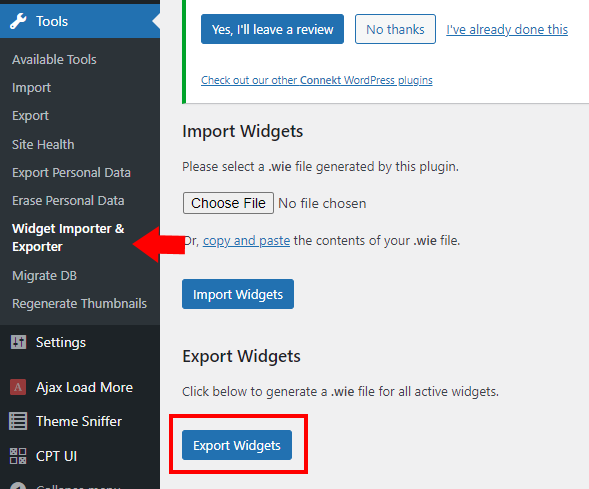
You’ll get a file with the extension .wie, which you can rename however you want. In my case, it will be widgets.wie
Setting up the One Click Demo import plugin
You have prepared files with the necessary content and settings. The tool that’ll allow you to automate the import process will be one of the most popular plugins designed for this purpose – One Click Demo import. As you probably remember, I’ve already prepared my test theme to automatically install this plugin by adding it to the list of required plugins:
     array(
        'name'     => 'One Click Demo Import',
        'slug'     => 'one-click-demo-import',
        'required' => TRUE,
     ),
The next step is to configure the plugin in your theme so that the plugin can locate your content and settings files immediately after installation.
In the function.php file of your theme, add the following code snippet:
/**
* Define your demo paths
* @return array[]
* Change params by adding your paths/url
*/

function rocksite_example_import_files() {
  return [
     [
        'import_file_name'           => 'Demo Import 1',
        'categories'                 => [ 'Category 1', 'Category 2' ],
        'import_file_url'            => 'http://www.your_domain.com/ocdi/demo-content.xml',
        'import_widget_file_url'     => 'http://www.your_domain.com/ocdi/widgets.json',
        'import_customizer_file_url' => 'http://www.your_domain.com/ocdi/customizer.dat',
        'import_preview_image_url'   => 'http://www.your_domain.com/ocdi/preview_import_image1.jpg',
        'preview_url'                => 'http://www.your_domain.com/my-demo-1',
     ],
     [
        'import_file_name'           => 'Demo Import 2',
        'categories'                 => [ 'New category', 'Old category' ],
        'import_file_url'            => 'http://www.your_domain.com/ocdi/demo-content2.xml',
        'import_widget_file_url'     => 'http://www.your_domain.com/ocdi/widgets2.json',
        'import_customizer_file_url' => 'http://www.your_domain.com/ocdi/customizer2.dat',
        'import_preview_image_url'   => 'http://www.your_domain.com/ocdi/preview_import_image2.jpg',
        'preview_url'                => 'http://www.your_domain.com/my-demo-2',
     ],
  ];
}
add_filter( 'ocdi/import_files', 'rocksite_example_import_files' );
As you can see here, we define the URL to the content and settings files. In this particular case, I added two separate demos to show that you can add any number of predefined demos. In addition to links to content and settings files, you can freely define a demo name and provide a link to the preview image. There are test tracks in the sample code.
How does it all work?
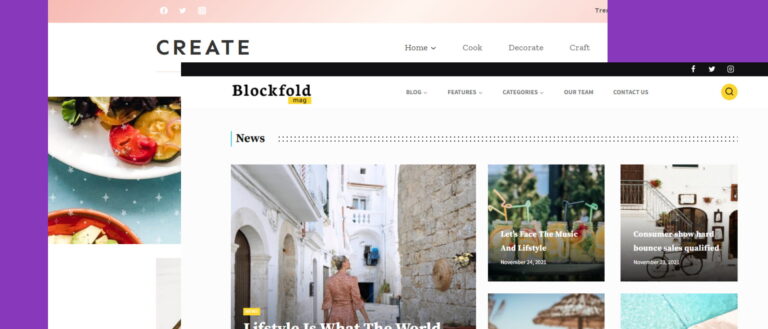
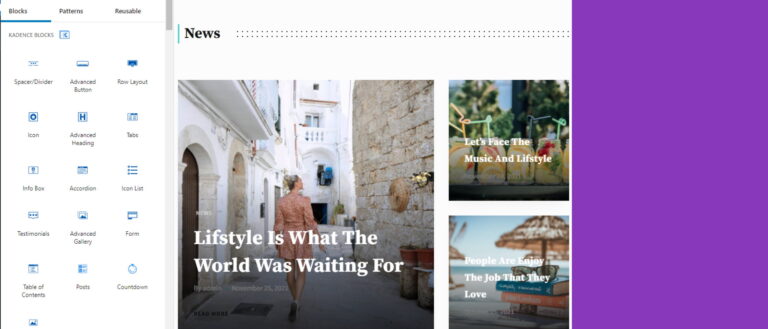
Thanks to this simple configuration in my Blockfold theme, the demo import panel looks like the screenshots below. The Import Demo Data panel is located in the Appearance tab:
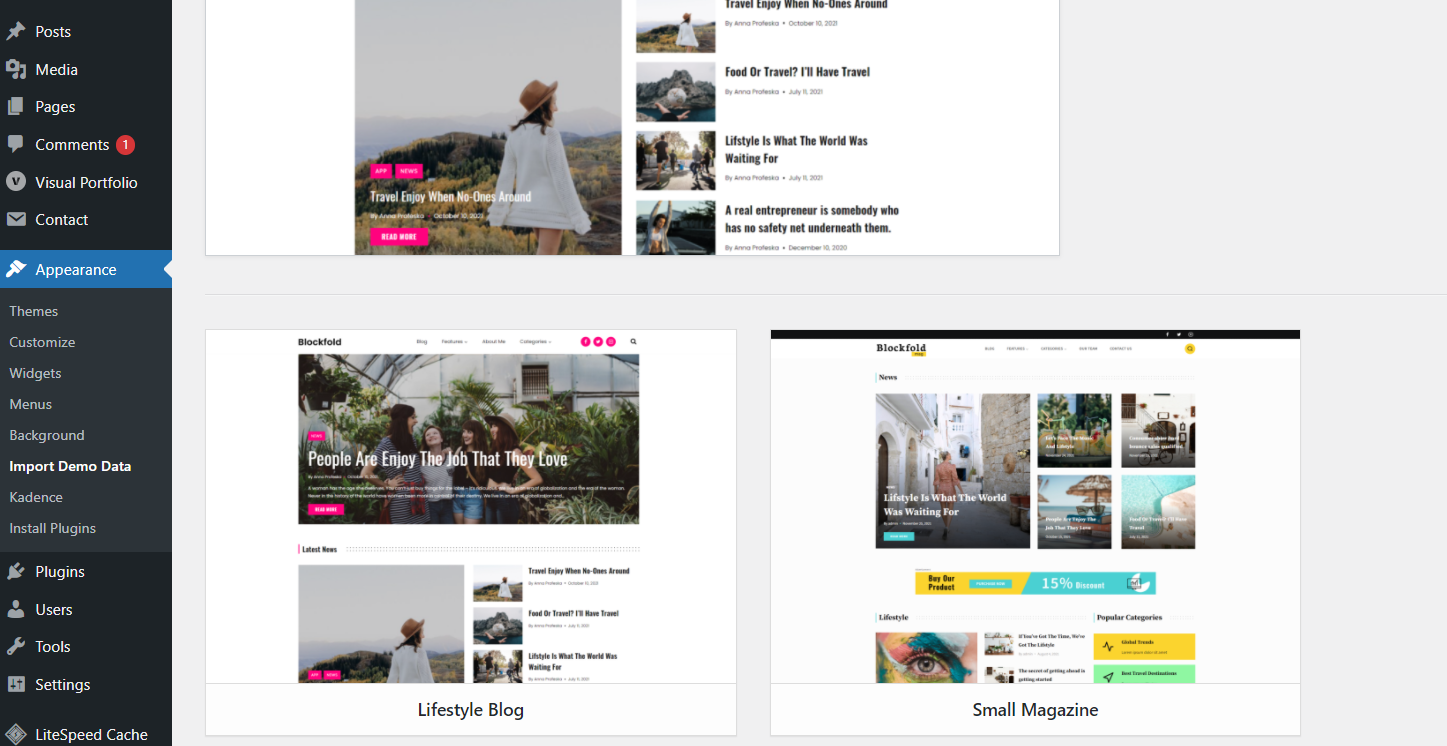
By clicking on the selected image, the user starts the demo installation process:
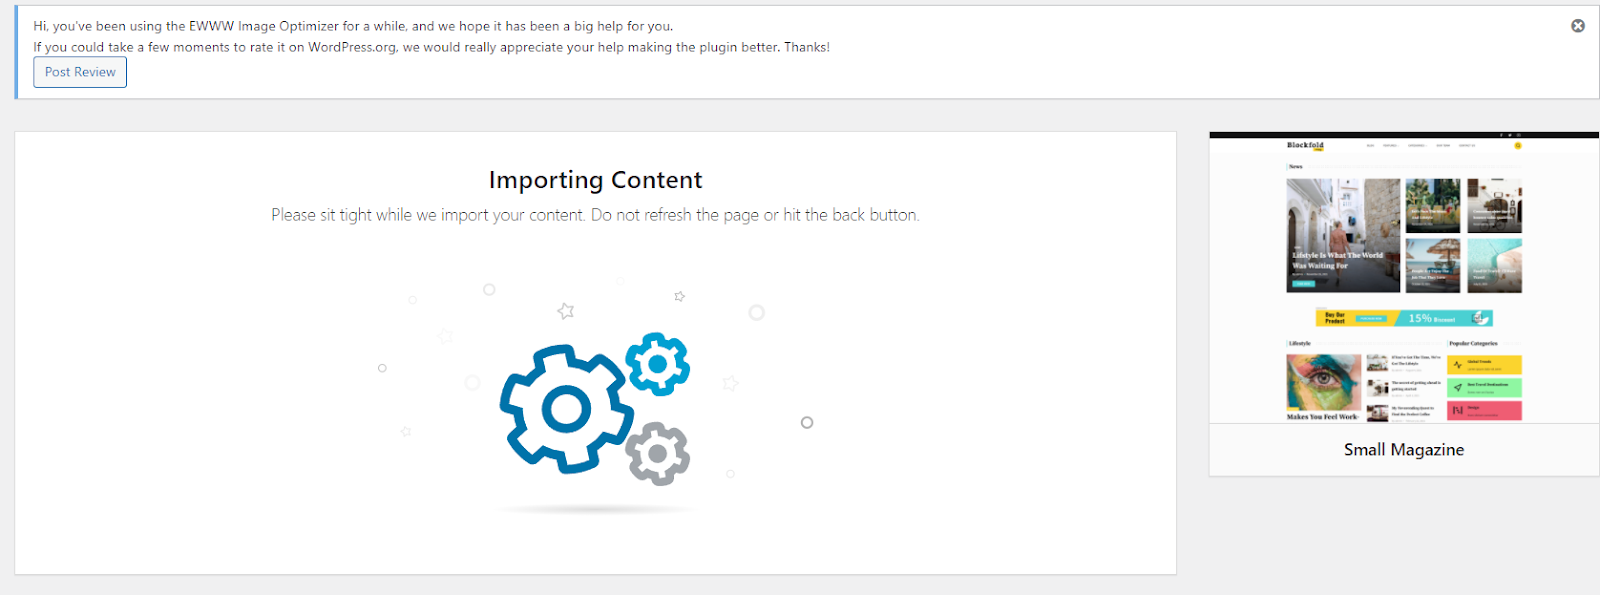
After a short time, all content and settings will be imported into your theme’s clean WordPress installation.
At this stage, however, the user will have to set up two items manually:
- Define the home page
- Assigning menus to appropriate areas on the page
The target homepage and the menu are elements that are already in the database. However, we need to add a few lines of code so that the user is not condemned to manual configuration.

We add automatic configuration of the Home Page and Menu.
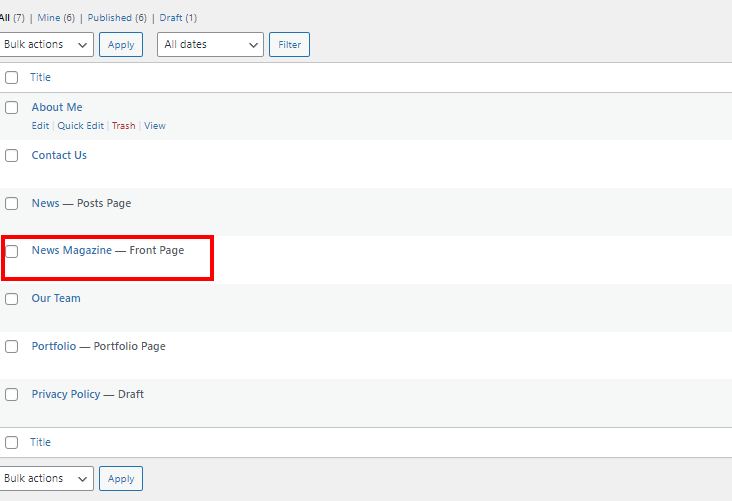
Let’s start with the homepage. In my case, the title of the homepage is News Magazine. The list of pages clearly shows that it is set as Front Page. I’d like this page to be automatically set up in this way when the user imports content:
Here is a rich set of filters and actions available in One Click Demo Import we can use when configuring the import process. The action/hack that will allow us to make automatic settings after the import is pt-ocdi/after_import
Below is an example of how you can use it:
function rocksite_example_after_import( $selected_import ) {


  _e( "blockfold import files were successfully downloaded!", 'blockfold' );


  // Menus to Import and assign - you can remove or add as many as you want


  // Use a static front page
  $home = get_page_by_title( 'News Magazine' );
  $blog = get_page_by_title( 'News' );


  if ( isset( $home->ID ) && $home->ID > 0 ) {

     update_option( 'page_on_front', $home->ID );
     update_option( 'page_for_posts', $blog->ID );
     update_option( 'show_on_front', 'page' );

  }
}

add_action( 'pt-ocdi/after_import', 'rocksite_example_after_import' );
The critical element is to replace the page titles with the correct ones for your demo. In my case, these pages are defined as follows:
  $home = get_page_by_title( 'News Magazine' );
  $blog = get_page_by_title( 'News' );
Similarly, you can set the menu areas. I defined the main menu in my theme and named it Main Menu. Because I’m creating a child theme for the Kadecne theme, the site where I should display the main menu in this theme is called Primary.

So let’s download the content of the menu called Main Menu:
$primary_menu = get_term_by('name', 'Main Menu', 'nav_menu');And we’ll assign them to the right area:
if (is_object($primary_menu)) {

   set_theme_mod('nav_menu_locations', array(

           'primary' => $primary_menu->term_id,

       )
   );

}
Remember that you need to replace these names with the correct ones for your theme as with the homepage.
The entire function performed immediately after importing the content looks like this:
function rocksite_example_after_import($selected_import)
{


   _e("Rocksite Example import files were successfully downloaded!", 'rocksite-example');


   // Menus to Import and assign - you can remove or add as many as you want
   $primary_menu = get_term_by('name', 'Main Menu', 'nav_menu');


   if (is_object($primary_menu)) {

       set_theme_mod('nav_menu_locations', array(

               'primary' => $primary_menu->term_id,

           )
       );

   }

   // Use a static front page
   $home = get_page_by_title('News Magazine');
   $blog = get_page_by_title('News');


   if (isset($home->ID) && $home->ID > 0) {

       update_option('page_on_front', $home->ID);
       update_option('page_for_posts', $blog->ID);
       update_option('show_on_front', 'page');

   }
}

add_action('pt-ocdi/after_import', 'rocksite_example_after_import');
We have handled the entire import process with a few extra code snippets, including configuration. Once the import process is complete, the user will see the finished site and can start the customization work right away. You can see the entire installation and copying process in the instructional video for my Blockfold theme:
You can download the entire code in the form of a Kadence child theme using the form below.